Hello Reader! Hope you are fine.
In this post I am going to tell you a very nice and easy trick to hide the group by labels or headings in grouped SharePoint list view. I don't know if you have faced such requirement yet but trust me there is a huge possibility of it. It is weird though isn't it? Why would you even want to hide it? If you have applied a group by why would you want to hide it? I don't know about you guys but the first thing that came to my mind is this. But anyways we have to do what our 'kindhearted' and 'soft-spoken' boss wants us to do. So lets start our mission!
There are 2 ways of doing it . One is to use CSS and other is using JavaScript. I'll be using JavaScript here because that's more flexible and you know that's what I do... provide you better solutions ;-).
Okay lets get serious now. We will use JavaScript in content editor web part to achieve our target.
First step is to note down the class name of the group by labels you want to hide. You can find it out using developer tools in our browsers.
How to find a page element

if(lastpart == "mylist.asp" || url.indexOf('mylist.aspx?View')>0)
{
var myele = document.getElementsByClassName('ms-gb')
for(var i=0;i<myele.length;i++)
{
myele[i].style.display="none"
}
var myele1 = document.getElementsByClassName('ms-gb2')
for(var i=0;i<myele1.length;i++)
{
myele1[i].style.display="none"
}
}
</script>
We have used "url.indexOf(''mylist.aspx?View)>0" because when you go back to first page of list from inside of any folder by clicking on bread crumb link of list on top it appends '?View' to the URL.
Finally I would like to mention that if you have multiple lists where you want to implement this you don't have to place this code in content editor in each of the pages. You can write your code something like :
<script language="javascript">
window.onload = function ()
{
var url = document.URL
if(url.indexOf('mylist.aspx') > -1) // to identify if
{
var lastpart = url.slice(-11,-1)
if(lastpart == "mylist.asp" || url.indexOf('mylist.aspx?View')>0)
{
var myele = document.getElementsByClassName('ms-gb')
for(var i=0;i<myele.length;i++)
{
myele[i].style.display="none"
}
var myele1 = document.getElementsByClassName('ms-gb2')
for(var i=0;i<myele1.length;i++)
{
myele1[i].style.display="none"
}
}
}
else if(url.indexOf(mylist1.aspx') > -1)
{
var lastpart = url.slice(-12,-1)
if(lastpart == "mylist1.asp" || url.indexOf(mylist1.aspx?View')>0)
{
var myele = document.getElementsByClassName('ms-gb')
for(var i=0;i<myele.length;i++)
{
myele[i].style.display="none"
}
var myele1 = document.getElementsByClassName('ms-gb2')
for(var i=0;i<myele1.length;i++)
{
myele1[i].style.display="none"
}
}
}
</script>
Then you can paste this code in a text file(.txt) and upload it in style library (in Site Contents) of your top level site (not in subsite) . Then paste the link of this txt file in content link of content editor.
SharePoint Facts
SharePoint 2013 came with a lot of new features. One of them is "Device Channels". It was introduced to enable users to view SharePoint sites in mobile devices like smart phones, tablets etc.
You can create different device channels for different devices and specify different master pages or CSS files for different devices. It matches the 'User Agent' substring that comes with a Http request from device browser with the device channels User Agent substring that we provide in inclusion rule like "windows phone OS" etc and applies the CSS file for that device. Pretty cool right?
In this post I am going to tell you a very nice and easy trick to hide the group by labels or headings in grouped SharePoint list view. I don't know if you have faced such requirement yet but trust me there is a huge possibility of it. It is weird though isn't it? Why would you even want to hide it? If you have applied a group by why would you want to hide it? I don't know about you guys but the first thing that came to my mind is this. But anyways we have to do what our 'kindhearted' and 'soft-spoken' boss wants us to do. So lets start our mission!
There are 2 ways of doing it . One is to use CSS and other is using JavaScript. I'll be using JavaScript here because that's more flexible and you know that's what I do... provide you better solutions ;-).
Okay lets get serious now. We will use JavaScript in content editor web part to achieve our target.
First step is to note down the class name of the group by labels you want to hide. You can find it out using developer tools in our browsers.
How to find a page element
- Simply press F12 and you can see a small pane with page source.
- Then select the element (group by label) to find it in page source. If you don't know how to select an element don't worry. For Internet Explorer click on the button with arrow symbol on top left corner. Or in Google Chrome click on the button that looks like a magnifying glass, then click on the element on page that you want to find on the page source.
- Now find the class name of the group by labels. It may look something like "ms-gb". It will be same for all the labels through out the page.
Now that we have the class name of the elements we want to hide, we can proceed further.
Add a Content Editor Web Part to your page(where you want to hide labels).
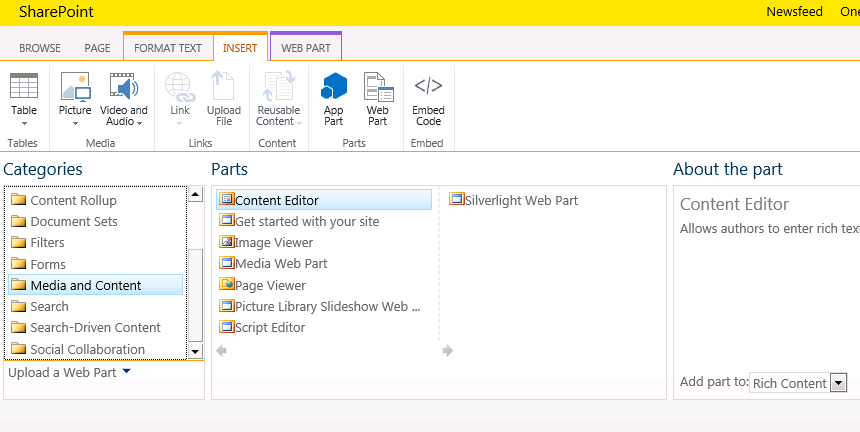
How to add Content Editor Web Part
How to add Content Editor Web Part
Steps to add a Content Editor web part :
- Click on the site settings button.
- Click on 'Edit Page'.
- Click on 'Insert' in Ribbon on top.
- Click on Web Part.
- Select 'Media and Content' from category of web parts.
- Then select Content Editor and click Add button.
Next click on the Content Editor web part and then click on 'Edit Source' on top.
Then you can write your code in a box that pops up. You can write this code to hide the group by labels :
<script language="javascript">
window.onload = function ()
{
var myele = document.getElementsByClassName('ms-gb')
for(var i=0;i<myele.length;i++)
{
myele[i].style.display="none"
}
// if you have more that one group by condition
var myele1 = document.getElementsByClassName('ms-gb2')
for(var i=0;i<myele1.length;i++)
{
myele1[i].style.display="none"
}
}
</script>
I must warn you this may cause flickering on screen. By flicker I mean the group by labels would be first visible for a second or so then it will disappear. This may not look so good. But only way that I know of to avoid this is to use CSS in page source. But editing the page source cannot be an option always. Like in my case it wasn't an option (so I had to live with it) because 1--> It was client's site 2--> If you hide it using CSS in page source it will hide the labels in all the pages of the list view. I'll explain this.
In your SharePoint list if you have folders or document sets on first level and then data inside it, CSS in page source or the JavaScript I have written above will hide the labels in all the levels(i.e for the items inside folders also). If you want to hide it only in say, first level you have to tweak the code. You have to differentiate the first page of the list from other pages (pages that come after clicking on folders) in your code. Now you understand why I had said earlier JavaScript is more flexible approach?
If you look closely when you click on a folder in your list, it doesn't go to a new page, it just adds parameters to it. For example if your list URL is something like this - https://servername/sites/sitename/mylist.aspx , then clicking on folder will take you to "siteurl/mylist?RootFolder=%something%". So I thought of a simple way to apply the script only on first page.
Use the JavaScript 'slice' function to get the last part of the URL.
<script language="javascript">
window.onload = function ()
{
var url = document.URL //considering your list url is the one given above
var lastpart = url.slice(-11,-1) //this returns mylist.asp (without the 'x')I must warn you this may cause flickering on screen. By flicker I mean the group by labels would be first visible for a second or so then it will disappear. This may not look so good. But only way that I know of to avoid this is to use CSS in page source. But editing the page source cannot be an option always. Like in my case it wasn't an option (so I had to live with it) because 1--> It was client's site 2--> If you hide it using CSS in page source it will hide the labels in all the pages of the list view. I'll explain this.
In your SharePoint list if you have folders or document sets on first level and then data inside it, CSS in page source or the JavaScript I have written above will hide the labels in all the levels(i.e for the items inside folders also). If you want to hide it only in say, first level you have to tweak the code. You have to differentiate the first page of the list from other pages (pages that come after clicking on folders) in your code. Now you understand why I had said earlier JavaScript is more flexible approach?
If you look closely when you click on a folder in your list, it doesn't go to a new page, it just adds parameters to it. For example if your list URL is something like this - https://servername/sites/sitename/mylist.aspx , then clicking on folder will take you to "siteurl/mylist?RootFolder=%something%". So I thought of a simple way to apply the script only on first page.
Use the JavaScript 'slice' function to get the last part of the URL.
<script language="javascript">
window.onload = function ()
{
var url = document.URL //considering your list url is the one given above
if(lastpart == "mylist.asp" || url.indexOf('mylist.aspx?View')>0)
{
var myele = document.getElementsByClassName('ms-gb')
for(var i=0;i<myele.length;i++)
{
myele[i].style.display="none"
}
var myele1 = document.getElementsByClassName('ms-gb2')
for(var i=0;i<myele1.length;i++)
{
myele1[i].style.display="none"
}
}
</script>
We have used "url.indexOf(''mylist.aspx?View)>0" because when you go back to first page of list from inside of any folder by clicking on bread crumb link of list on top it appends '?View' to the URL.
Finally I would like to mention that if you have multiple lists where you want to implement this you don't have to place this code in content editor in each of the pages. You can write your code something like :
<script language="javascript">
window.onload = function ()
{
var url = document.URL
if(url.indexOf('mylist.aspx') > -1) // to identify if
{
var lastpart = url.slice(-11,-1)
if(lastpart == "mylist.asp" || url.indexOf('mylist.aspx?View')>0)
{
var myele = document.getElementsByClassName('ms-gb')
for(var i=0;i<myele.length;i++)
{
myele[i].style.display="none"
}
var myele1 = document.getElementsByClassName('ms-gb2')
for(var i=0;i<myele1.length;i++)
{
myele1[i].style.display="none"
}
}
}
else if(url.indexOf(mylist1.aspx') > -1)
{
var lastpart = url.slice(-12,-1)
if(lastpart == "mylist1.asp" || url.indexOf(mylist1.aspx?View')>0)
{
var myele = document.getElementsByClassName('ms-gb')
for(var i=0;i<myele.length;i++)
{
myele[i].style.display="none"
}
var myele1 = document.getElementsByClassName('ms-gb2')
for(var i=0;i<myele1.length;i++)
{
myele1[i].style.display="none"
}
}
}
</script>
Then you can paste this code in a text file(.txt) and upload it in style library (in Site Contents) of your top level site (not in subsite) . Then paste the link of this txt file in content link of content editor.
- Click on Edit page
- Click of content editor Edit Web Part
- paste the link of the text file with script in content link.
- Click OK.
SharePoint Facts
SharePoint 2013 came with a lot of new features. One of them is "Device Channels". It was introduced to enable users to view SharePoint sites in mobile devices like smart phones, tablets etc.
You can create different device channels for different devices and specify different master pages or CSS files for different devices. It matches the 'User Agent' substring that comes with a Http request from device browser with the device channels User Agent substring that we provide in inclusion rule like "windows phone OS" etc and applies the CSS file for that device. Pretty cool right?


